
Universitatis
Miskatoniciensis
Miskatoniciensis

IntroductionIn this article I will demonstrate how to implement multiple file uploads with real-time progress bars within an ASP.net solution using the Uploadify libraries. The HttpHandler class developed herein should easily plug and play into any ASP.net application, along with the provided ASP.net control or class, making this useful as plug-in-play code as well as a demonstration of how to program the HttpHandler. In addition, I have added additional features in the ASP.net layer, including file extension filtering, post-back upon completion, and session-based security. BackgroundWith HTML5 came the promise of handling the upload of multiple files simultaneously without the use of ActiveX or other plug-ins. But plain HTML5 does not support real progress bars during the upload and is handled somewhat differently by each browser. And I needed a secure solution which allowed for file extension filtering. In search of a solution to replace my older solution, I found Uploadify. Apprarently this library was originally written as a Flash plug-in, but a HTML5 solution was released in 2012. The Flash library is free. Regrettably, the HTML5 library comes at a small fee, either $5 or $100 if you wish to distribute the library. Ultimately, I decided it was a small cost for what appeared to be a quality product, but each of you will have to make that determination. I did implement the Flash version in the code included in case it was useful for others. And maybe it will be useful for older browsers in my projects. Also unfortunately, there were no clear examples online of implementing this solution within an ASP.net project. 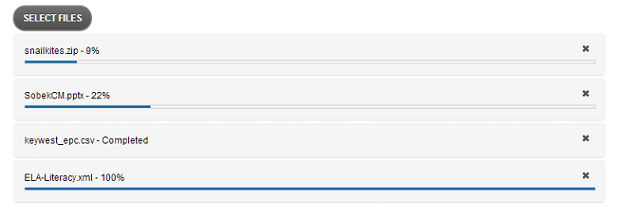
In this solution, I have wrapped the options within both a C# class (for writing directly to an output stream without controls) and also a C# web control. The classes handle most of the options which the library can handle. In addition, I added javascript support for filtering the upload files client-side and server-side. The security aspects (and server-side file filtering) require the use of the session state, but help to prevent unwanted uploads. Other options necessary for my project are also added to the C# classes/controls. Using the codeBefore you get startedBefore using the included code as-is, you should choose either the free Flash version or the HTML5 library. The entire contents of the Flash version should be placed in the empty Uploadify subfolder whereas the contents of the HTML5 version should be placed in the empty UploadiFive subfolder. The Flash version is utilized for the third demo (Demo3.aspx) and the HTML5 version is utilized for the first two demos. Referencing librariesYou will need to add references to the required jQuery library and the Uploadify library chosen. A standard css file comes with the packages, so I have referenced that as well in my code. Add the following lines in the head of your ASPX form. <script src="jquery/jquery-1.10.2.js" type="text/javascript"></script>
<script src="uploadifive/jquery.uploadifive.js" type="text/javascript"></script>
<link rel="stylesheet" type="text/css" href="uploadifive/uploadifive.css" />
or
	<script src="jquery/jquery-1.10.2.js" type="text/javascript"></script>
	<script src="uploadify/jquery.uploadify.js" type="text/javascript"></script>
	<link rel="stylesheet" type="text/css" href="uploadify/uploadify.css" />
Adding the control to your pageFor ASP.net web forms, you can add this control to your page by instantiating the // Get the save path
string savepath = Context.Server.MapPath("files");
// Create the upload control and add to the form
UploadiFiveControl uploadControl = new UploadiFiveControl
{
UploadPath = savepath,
RemoveCompleted = true,
SubmitWhenQueueCompletes = true,
AllowedFileExtensions = ".jpg|.bmp"
};
form1.Controls.Add(uploadControl);
Adding the control in MVC should work analagously. Utilizing the Flash version is quite simple, as the same control and classes are utilized, but the version flag is set to Flash, rather than the default. All other changes, including the name change for some of the options, are handled by the control. // Create the upload control and add to the form
UploadiFiveControl uploadControl = new UploadiFiveControl
{
UploadPath = savepath,
RemoveCompleted = true,
SubmitWhenQueueCompletes = true,
AllowedFileExtensions = ".jpg|.bmp",
Version = UploadiFive_Version_Enum.Flash
};
form1.Controls.Add(uploadControl);
HttpHandler for the uploaded filesYou will also need to add the Security and the HttpHandlerCreating the HttpHandler is fairly straightforward, but providing for flexibility and adding
security makes it slightly more complicated. This implementation utilized the session state to
provide security and pass information from the uploading page to the handler. For this purpose, the
/// <summary> Token used to add security, via adding a key to the session
/// state, for uploading documents through this system </summary>
public class UploadiFive_Security_Token
{
  /// <summary> Path where the uploaded files should go </summary>
  public readonly string UploadPath;

  /// <summary> List of file extensions allowed </summary>
  public readonly string AllowedFileExtensions;

  /// <summary> Name of the file object to use in your server-side script</summary>
  public readonly string FileObjName;

  /// <summary> The GUID for this security token </summary>
  public readonly Guid ThisGuid;

  /// <summary> Constructor for a new instance of the UploadiFive_Security_Token class</summary>
  /// <param name="UploadPath"> Path where the uploaded files should go </param>
  /// <param name="AllowedFileExtensions"> List of file extensions allowed </param>
  /// <param name="FileObjName"> Name of file object to use in your server-side script </param>
  public UploadiFive_Security_Token(string UploadPath, string AllowedFileExtensions,
	string FileObjName )
  {
    this.UploadPath = UploadPath;
    this.AllowedFileExtensions = AllowedFileExtensions;
    this.FileObjName = FileObjName;
    ThisGuid = Guid.NewGuid();
  }
}
As you can see, this class holds the path where the file should be saved, the allowable file
extensions, and the key under which the file will be found by the handler. When the
// Create a new security token with all the configuration info
UploadiFive_Security_Token newToken =
          new UploadiFive_Security_Token(UploadPath, AllowedFileExtensions, FileObjName);

// Add this token to the current session for the HttpHandler
HttpContext.Current.Session["#UPLOADIFIVE::" + newToken.ThisGuid.ToString()] = newToken;

// Save the token into the formdata so comes to the HttpHandler
FormData["token"] = newToken.ThisGuid.ToString();
The form data is included in the javascript to create the Uploadify control. Below is a sample of the resultant HTML, without any file extension restrictions:
<input id="file_upload" name="file_upload" class="file_upload" type="file" />

<script type="text/javascript">
  $(document).ready(function() {
    $('#file_upload').uploadifive({
      'fileObjName': 'Filedata',
      'formData': { 'token' : 'da66e0ad-750b-4d76-a016-72633dea8b53' },
      'onQueueComplete': function (uploads) { $('#file_upload').closest("form").submit(); },
      'uploadScript': 'UploadiFiveFileHandler.ashx'
    });
  });
</script>
As you can see above, the GUID generated by the security token is included in the javascript to initialize the library. The HttpHandler needs access to the session state, so it needs to implement the
Context.Response.ContentType = "text/plain";
Context.Response.Expires = -1;

// Try to get the security token key
string tokenKey = Context.Request["token"];
if (tokenKey == null)
{
	Context.Response.Write("No token provided with this request");
	Context.Response.StatusCode = 401;
	return;
}

// Try to get the matching token object from the session
UploadiFive_Security_Token tokenObj =
	Context.Session["#UPLOADIFIVE::" + tokenKey] as UploadiFive_Security_Token;

if (tokenObj == null)
{
	Context.Response.Write("No matching server-side token found for this request");
	Context.Response.StatusCode = 401;
	return;
}

try
{
	// Get the posted file from the appropriate file key
	HttpPostedFile postedFile = Context.Request.Files[ tokenObj.FileObjName ];
	if (postedFile != null)
	{
		// Get the path from the token and ensure it exists
		string path = tokenObj.UploadPath;
		if (!Directory.Exists(path))
			Directory.CreateDirectory(path);

		string filename = Path.GetFileName(postedFile.FileName);
		postedFile.SaveAs(path + @"\" + filename);

		// Post a successful status
		Context.Response.Write(filename);
		Context.Response.StatusCode = 200;
	}
}
catch (Exception ex)
{
	Context.Response.Write("Error: " + ex.Message);
	Context.Response.StatusCode = 500;
}
With this code added, file extension restrictions are implemented at the client and server. HistoryOriginal code posted on December 15th, 2013. All the code is available for download here. |