SMaRT Tool : Item Discovery Form
General
The Item Discovery Form is usually the first stop for any tracking within the system. From the discovery form, a user can perform a search against the entire system, search against a single aggregation, or browse all the items within an aggregation. The discovery form then shows the results in a large grid, allowing the user to perform basic tracking-type behaviors or export a report in a variety of forms. This is also a good first step for drilling down into a single item group/title.
The Item Discovery Form generally displays at the item group / title level, unless there is only one volume in the title which matches the search, in which case the volume id is also included in the form. Since much of the metadata can be assigned at the item level, the system quickly steps through the first 100 volumes within a title to see if the author and publisher are the same. If they are all the same, then that value is displayed. Otherwise, the string ( varies ) is displayed in the item discovery form.
Examples
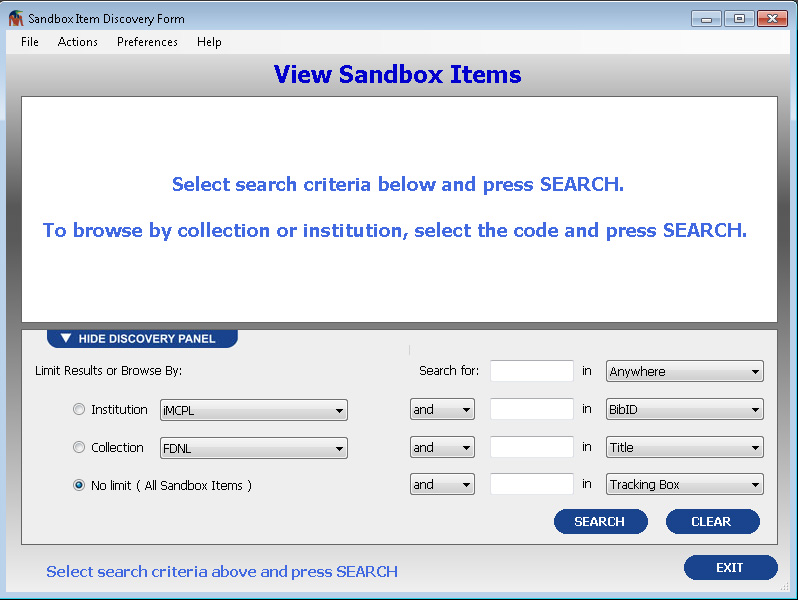
When the Item Discovery Form is first launched, the form will be mostly blank.
 |
| Figure 1: Blank SMaRT Tool Item Discovery Form |
To browse all the items in an aggregation, select the Collection or Institution on the lower left and press the SEARCH button. To perform a search, select the aggregation to search against (or leave the scope to include all items) and enter your advanced search at the lower right and select SEARCH. The application will remember the fields you generally prefer to use in the advanced search and will alway restore those fields when you begin the application again.
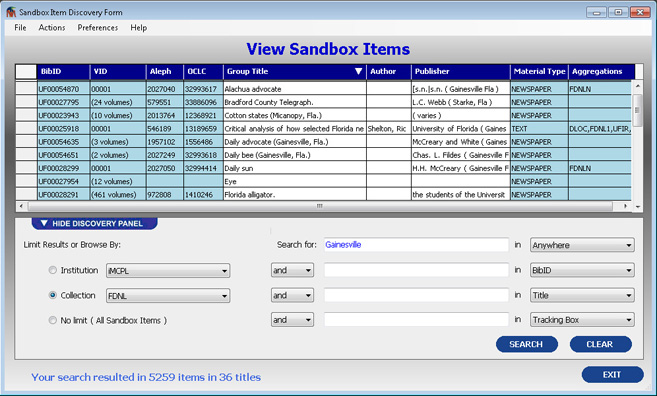
Below is an example where a user has selected the FDNL collection and searched for the term Gainesville anyway:
 |
| Figure 2: SMaRT Tool Item Discovery Form ( click to view larger version ) |
This list of items is identical to the list you would get from within the web application if you did a similar search, however this form may include some additional data and is presented as a large grid, rather than forcing you to step through the results page-by-page in the web application.
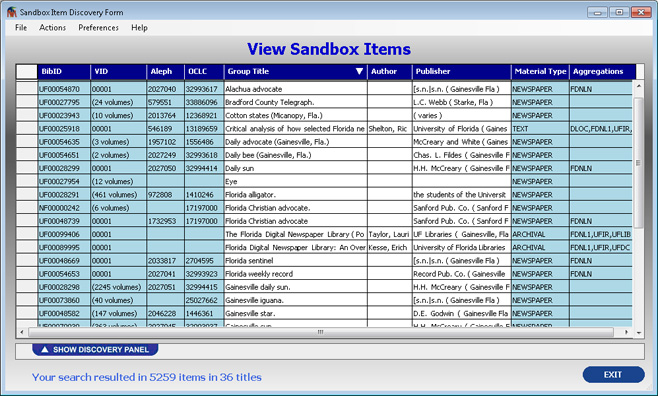
To see more rows you can maximize the form on your screen and you can also hide the discovery panel which appears at the bottom of the form, as show below:
 |
| Figure 3: SMaRT Tool Item Discovery Form ( click to view larger version ) |
A couple notes about the example above:
- The first row is a title with the bibliographic identifier (BibID) of UF00054870 and the title Alachua advocate. Since there is only one volume in this title which matches your search, the volume identifier (VID) for that volume is displayed. The sec
- The second row (and title) has 24 volumes which match the search, so the value (24 volumes) displays under the VID (volume identifier) column. All of these volumes have the same publisher and none have an author, as the row shows.
- The third row in the example above is an example where there is some variation for the publisher within the items in that title. In that case, the value ( varies ) displays under the Publisher column.
If there are no local catalog numbers (Aleph), OCLC numbers, authors, or publishers within the result set, those columns will be hidden to save screen space.
By default, double-clicking a row within this form will launch the Item Group Form for that item group/title.
Capabilities from the Item Discovery Form
Main Menu
Some capabilities are only accessible, or displayed, from the main menu at the top of the form.
- From the File menu, you can save the data as an excel spreadsheet ( .xls or .xlsx ), a tab-delimited text file ( .txt), a comma-seperated value ( .csv ) file, or as a XML data file.
- From the Actions menu, or by selecting F10, you can port this search into the Ad Hoc Report Generator, which provides access to many more of the individual tracking values associated with the items.
- From the Preferences menu, you can change the search precision ( i.e., match exactly, be a form of the same word, or be any word with similar meaning), change what happens when you double-click a row ( either open the Item Group Form or launch into a web browse ), and change what happens when you do a search which returns only a single title.
- Under the Actions menu you can also find many of the actions which are covered in the next section and are accessible directly from the main grid.
Result Grid
If you select a number of rows in the grid (or select the button in the upper left corner of the grid to select all rows), you can hit Ctrl-C to copy the rows into your clipboard, from where it can be pasted into an Excel spreadsheet or a text file.
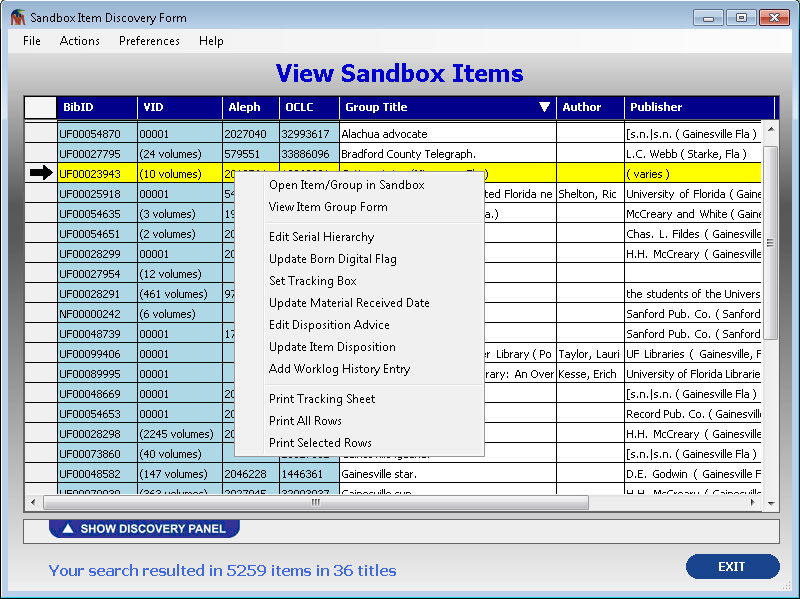
By right clicking on a selected row or a set of selected rows, a context menu will appear with many more capabilities, many of which appear in the Actions menu above. The screen below shows these capabilities and the information below explains each capability:
 |
| Figure 4: SMaRT Tool Item Discovery Form |
| Open Item/Group in [Sandbox]. | This option simply opens the currently selected row (or first currently selected row) in your instance of SobekCM in your default browser. |
| View Item Group Form. | This option opens the currently selected row (or first currently selected row) in the item group form in the SMaRT application. |
| Edit Serial Hierarchy. | This opens the currently selected row in the serial hierarchy mass update form which allows the serial hierarchy to be simultaneously edited for all of the items/volumes within an item group/title. |
| Update Born Digital. | This option allows you to set the born digital flag ( to either TRUE or FALSE ) for all selected items and item groups. |
| Set Tracking Box. | This allows the user to set the tracking box which mutliple items and item groups are assigned to. This essentially aggregates a number of items into a sub-project or relates them to the physical box in which they are being digitized. |
| Update Material Received Date. | With this option a user can set the day material was received into the office for multiple items or item groups. |
| Edit Disposition Advice. | This option allows advice notes to be added to the material to indicate how the material should be disposed of once digitization is complete. (i.e., 'return to special collections', 'discard when complete', etc.. ) |
| Update Item Disposition. | Multiple items and titles can be marked at disposed of, and additionally add notes related to the actual disposition. (i.e., 'returned to John Smith in special collections', etc.. ) |
| Add Worklog History Entry. | Worklog history events can be manually entered here for multiple items and item groups. This can be done to correct a mistake in the automatic entry of worklog history, or to add additional information manually. |
| Print Tracking Sheet. | This option prints a paper which includes the identifier for the item and some basic metadata. This sheet generally accompanies the material during digitization. |
| Print All/Selected Rows. | This option prints a grid view of the selected, or all, the rows in the current view. |
Each column can be sorted independently. Sorting by the group title actually sorts by the sort title field, to allow for article-aware sorting.
Related Links
Additional help is available on the following topics:
