SMaRT Tool : Item Group Form
General
The Item Group form displays the basic information about a single item group/title and provides access to all the items which belong to the title. Some capabilities are provided directly from the SMaRT tool here, and others launch a particular function in your SobekCM instance in your default browser.
From this form, several actions can be performed on the items ( or a subset of the items ) in the item groups, and a single item can be viewed in the Item Form.
Examples
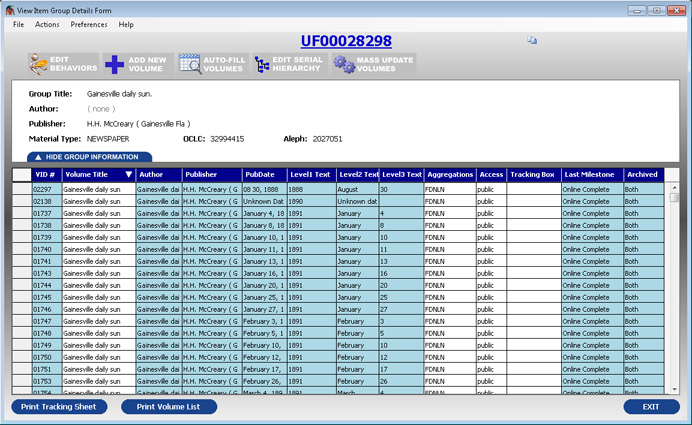
Below is an example of viewing a newspaper title in the item group form:
 |
| Figure 1: SMaRT Tool Item Group Form ( click to view larger version ) |
In the example you can see all the volumes which are part of the Gainesville daily sun title. The following fields may be included for each item:
- VID# ( Volume identifier within the item group )
- Author for the volume
- Publisher for the volume
- Publication date ( PubDate)
- Serial hierarchy ( i.e., Level 1 Text, Level 2 Text, and Level 3 Text )
- Aggregations which each item is linked to
- Access to the volume ( i.e., public, private, Dark, or IP Restricted )
- Tracking box - if a tracking box is assigned to each volume
- Last milestone acheived in the digitization effort ( i.e., Digital Acquisition Complete, Post-Acquisition Processing, Quality Control Performed, or Online Complete )
- Indicator of how the material has been archived ( i.e., [Blank], Locally, Remotely, or Both )
You can sort by each column independently, although the following rules apply to sorting:
- Sorting by the volume title actually uses a sort title to allow article-intelligent sorting
- Sorting by the data actually uses a sort date value to allow for correct sorting
- Sorting by title also sorts by the serial hierarchy indexes
- Sorting by the serial hierarchy text values ( Level 1 Text, Level 2 Text, Level 3 Text ) actually uses a hidden index field to do the sorting. These sort indexes can be accessed through the serial hierarchy mass update form.
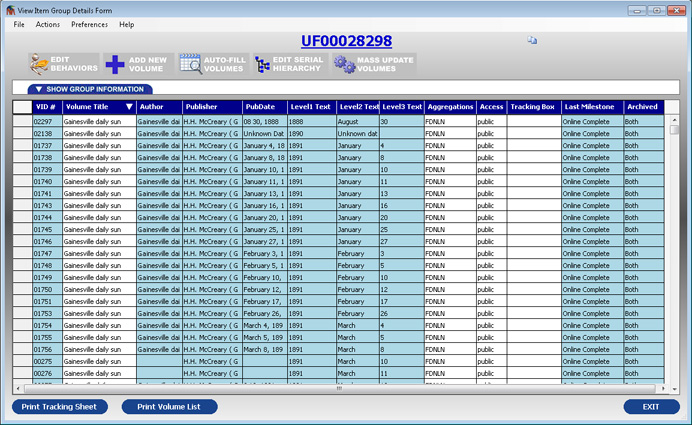
The group information panel can be collapsed to allow more of the item rows to be displayed:
 |
| Figure 2: SMaRT Tool Item Group Form ( click to view larger version ) |
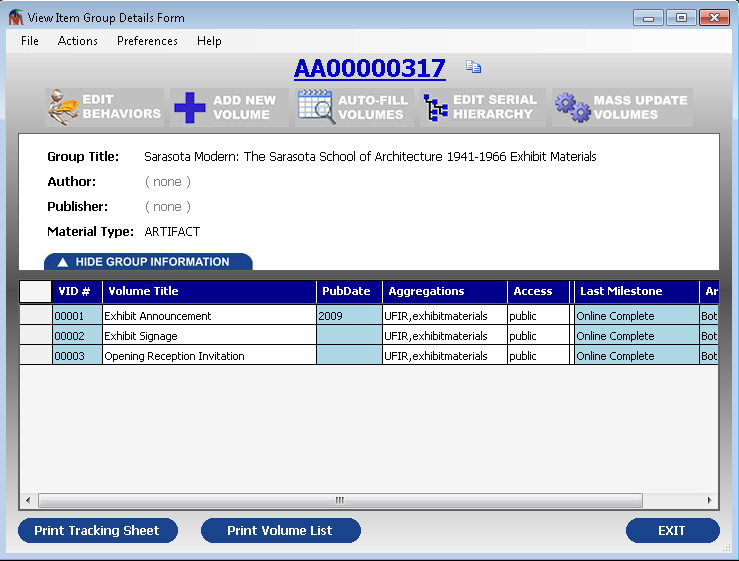
Below is an additional example which is not a newspaper type content. In this example you can see that columns which have no values ( such as the author, publisher, and serial hierarchy fields in this case ) are not displayed.
 |
| Figure 3: SMaRT Tool Item Group Form |
Capabilities from the Item Group Form
Main Menu
Some capabilities are only accessible, or displayed, from the main menu at the top of the form.
- From the File menu, you can save the data as an excel spreadsheet ( .xls or .xlsx ), a tab-delimited text file ( .txt), a comma-seperated value ( .csv ) file, or as a XML data file.
- From the Actions menu, or by selecting F10, you can port this search into the Ad Hoc Report Generator, which provides access to many more of the individual tracking values associated with the items.
- From the Preferences menu, you can change what happens when you double-click a row ( either open the Item Form or launch into a web browse ).
- Under the Actions menu you can also find many of the actions which are covered in the next section and are accessible directly from the main grid.
Five Large Buttons Under the BibID
The large buttons underneath the BibID are identical to the buttons which appear in the internal header on the SobekCM web application when viewing a title online. Many of these buttons link back to the web to perform the work.
 |
| Figure 4: Five Large Buttons Under the BibID |
| Edit Behaviors. | Links to the SobekCM web instance to allow the user to edit the behaviors linked to this item group/title. | |
| Add New Volume. | Links to the SobekCM web instance to add a single item/volume to this existing item group/title. | |
| Auto-Fill Volumes. | In the SMaRT application, this opens the volume import form and pre-populates the volume information to which to add the new volumes in bulk. | |
| Edit Serial Hierarchy. | In the SMaRT application, this opens the serial hierarchy mass update form. | |
| Mass Update Volumes. | Links to the SobekCM web instance to allow mass updates to all items/volumes within this item group/title. |
Result Grid
If you select a number of rows in the grid (or select the button in the upper left corner of the grid to select all rows), you can hit Ctrl-C to copy the rows into your clipboard, from where it can be pasted into an Excel spreadsheet or a text file.
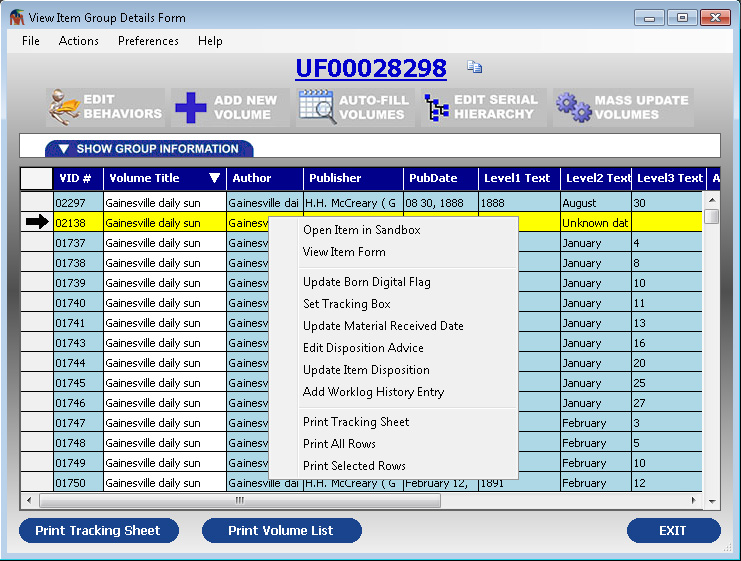
By right clicking on a selected row or a set of selected rows, a context menu will appear with many more capabilities, many of which appear in the Actions menu above. The screen below shows these capabilities and the information below explains each capability:
 |
| Figure 5: SMaRT Tool Item Group Form |
| Open Item in [Sandbox]. | This option simply opens the currently selected row (or first currently selected row) in your instance of SobekCM in your default browser. |
| View Item Form. | This option opens the currently selected row (or first currently selected row) in the item form in the SMaRT application. |
| Update Born Digital. | This option allows you to set the born digital flag ( to either TRUE or FALSE ) for all selected items within this item group. |
| Set Tracking Box. | This allows the user to set the tracking box which mutliple items within this item group are assigned to. This essentially aggregates a number of items into a sub-project or relates them to the physical box in which they are being digitized. |
| Update Material Received Date. | With this option a user can set the day material was received into the office for multiple items within this item group. |
| Edit Disposition Advice. | This option allows advice notes to be added to the material to indicate how the material should be disposed of once digitization is complete. (i.e., 'return to special collections', 'discard when complete', etc.. ) |
| Update Item Disposition. | Multiple items within this item group can be marked at disposed of, and additionally add notes related to the actual disposition. (i.e., 'returned to John Smith in special collections', etc.. ) |
| Add Worklog History Entry. | Worklog history events can be manually entered here for multiple items. This can be done to correct a mistake in the automatic entry of worklog history, or to add additional information manually. |
| Print Tracking Sheet. | This option prints a paper which includes the identifier for the item and some basic metadata. This sheet generally accompanies the material during digitization. |
| Print All/Selected Rows. | This option prints a grid view of the selected, or all, the rows in the current view. |
Related Links
Additional help is available on the following topics:
