| SobekCM Repository Community Help |
Solr/Lucene Installation and Configuration
The Solr/Lucene indexes are used for all full-text searching and (as of version 5.0) all general metadata searches. In addition, this version does map coordinate searching, user folders, and really anything else that interacts with the metadata through the web interface.
In previous versions, metadata and coordinate searching was slowly transitioning from database searchs to solr, but that transition is now complete, vastly simplifying the database schema and stored procedures. Therefor, Solr is mandatory for ANY searching within SobekCM now.
Security
Most important is to not expose your solr ports to the outside world! That is the easiest first step in security.
It is also recommended to use HTTPS for solr, even if it a self-signed certification.
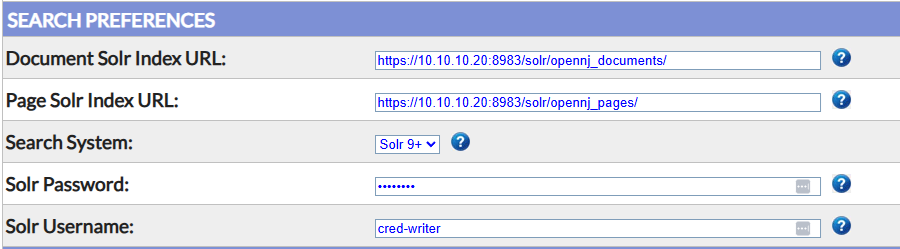
Finally, you can set Basic Authentication and roles in your solr instance. Enter the username/password for the reader/writer permissions in the Solr Username and Solr Password fields within the UI under SobekCM Settings under the System Admin portion of the online website. (see last step on this page)
Software Installs
Installation of the following software packages is required for the Solr/Lucene index server:
- Java ( we currently use Java 25 )
- We currently use Solr 10.0.0-slim for the solr version.
Previous versions of SobekCM used solr.net, but we now create and process the JSON messages with solr directly. You can still use the new SobekCM with the older solr indexes, although geographic searching will probably not work until you upgrade to Solr 9+.
After upgrading you will need to recreate your Solr indexes. There is a developer resource under Utilities named SolrReindexer in the SobekCM repo which will facilitate this.
Once you finish re-indexing, go into the online system settings and you can set the Solr version to 'Solr 9+' the the sys admin online UI.
Solr/Lucene Configuration
There are two Solr/Lucene indexes used, one for searching within ALL documents, and one for searching within a single document. Because of this, you will be running a multi-core instance of Solr/Lucene. Steps below indicate how to configure your instance of Solr/Lucene and install the SobekCM indexes. Below are also sites which may assist you with more detail on the configuration:
- Download Solr 10.0.0-slim of solr and unzip into your local drive. This documentation assumes you unzipped it into C:\solr-10.0.0, but you can really put it anywhere.
- Copy the two Configuration folders (found in the Github repo under SobekCM-Web-Application\Solr) into the solr server folder ( C:\solr-10.0.0\server\solr ). One core is for searching documents and the second for searching pages within a document) into the solr server. These folders have the full schema information for the cores. The exact locations of the two Configuration folders to copy is SobekCM-Web-Application\Solr\pages\Configuration\test_pages and SobekCM-Web-Application\Solr\documents\Configuration\test_documents.
- Create folders where you would like to keep the indexes, again one for the documents and another for the pages.
- Now, you need to tell the folders under the server/solr where the indexes will be kept. So, go into the two schema folders and edit the core.properties file. Found at C:\solr-10.0.0\server\solr\test_documents and C:\solr-10.0.0\server\solr\test_pages. You will want to update the dataDir value to point where the indexes should go.
- Start solr running by going to the C:\solr-10.0.0\bin and typing 'solr start'. To stop solr, you can run 'solr stop -all' if you don't have anything else using solr on that machine.
- Navigate to http://localhost:8983/solr/ to test the setup
You will almost certainly want to set the size of the heap. The main optons are -Xms, which sets the initial size of the JVM’s memory heap, and -Xmx, which sets the maximum size of the heap. In Windows, add the following line to the bin\solr.in.cmd file.
set SOLR_JAVA_MEM=-Xms4g -Xmx4g
Running Solr/Lucene On Linux
You can also run Solr on linux and just follow very similar instructions. For your help, below are some of the linux commands we used to install it.
## INSTALL JAVA
sudo apt install default-jdk wget gpg dirmngr -y

## INSTALL SOLR
wget https://downloads.apache.org/solr/solr/10.0.0/solr-10.0.0-slim.tgz
tar -xzf solr-10.0.0-slim.tgz
sudo bash ./solr-10.0.0-slim/bin/install_solr_service.sh solr-10.0.0-slim.tgz
rm -rf ./solr-10.0.0-slim

## CONFIGURE STARTUP
sudo systemctl edit solr

ADD THIS:
	[Service]
	ExecStart=
	ExecStart=/opt/solr/bin/solr start --user-managed
	Restart=on-failure
	RestartSec=10

## START SOLR
sudo systemctl restart solr
sudo systemctl status solr
curl http://localhost:8983/solr/

## FORCE KILL SOLR
sudo pkill -f solr
sudo systemctl daemon-reload
sudo -u solr /opt/solr/bin/solr status

## DEBUG SOLR NOT RUNNING OR STARTING
sudo journalctl -u solr -n 50 --no-pager
sudo tail -n 50 /var/solr/logs/solr.log
sudo tail -n 50 /var/solr/logs/solr-8983-console.log

## COPY TEMPLATE CORES AND RENAME FOR XYZ INSTANCE
sudo mkdir -p /var/solr/data/sobekcm/xyz
sudo cp -a /var/solr/templates/sobekcm-template/test_documents /var/solr/data/sobekcm/xyz/xyz_documents
sudo cp -a /var/solr/templates/sobekcm-template/test_pages /var/solr/data/sobekcm/xyz/xyz_pages

sudo chown -R solr:solr /var/solr/data/sobekcm/xyz

sudo sed -i 's/test/xyz/g' /var/solr/data/sobekcm/xyz/xyz_documents/core.properties
sudo sed -i 's/test/xyz/g' /var/solr/data/sobekcm/xyz/xyz_pages/core.properties
Memory Management Settings
The arguments which help to control the JVM heap, as well as some of the security and SSL settings are in /etc/default/solr.in.sh
sudo nano /etc/default/solr.in.sh
To increase the heap memory, add this line the file.
SOLR_JAVA_MEM="-Xms4g -Xmx4g"
Enabling SSL
To enable SSL, need to add versions of this line, once you create the self-signed certificate. Don't forget to get your SobekCM server and builder machine to trust that cert by adding it in their Trusted Root Certificate Authorities area via the MMC snap-in.
It should be noted, this was the added configuration before adding basic authentication and roles.
SOLR_HOST=10.10.10.20
SOLR_HOST_BIND=10.10.10.20

SOLR_SSL_ENABLED=true
SOLR_SSL_KEY_STORE=/var/solr/tls/solr-ssl.keystore.p12
SOLR_SSL_KEY_STORE_PASSWORD=my_password
SOLR_SSL_TRUST_STORE=/var/solr/tls/solr-ssl.keystore.p12
SOLR_SSL_TRUST_STORE_PASSWORD=my_password

SOLR_SSL_NEED_CLIENT_AUTH=false
SOLR_SSL_WANT_CLIENT_AUTH=false
SOLR_SSL_CHECK_PEER_NAME=true
Enabling Basic Authentication and Roles
To enable basic authentication and roles, you will need to generate the encrypted password in the proper format for Solr. Passwords are stored as base64(sha256(sha256(salt+password))) base64(salt).
Once you have the the names for your users, and encrypted passwords, generate the following security json file by calling:
sudo nano /var/solr/data/security.jsonBoth the website and builder will need to be able to index into solr, if people are submitting materials online. (Usernames and password below are generic fillers.)
Below is the JSON you should copy into the security.json file listed above.
{
  "authentication": {
    "blockUnknown": true,
    "class": "solr.BasicAuthPlugin",
    "credentials": {
	  "cred-superadmin": "3pP5wMN5HHGkBAjkZdsZ4hQ6GaPm4yiXXuNXdw1PGt4= 2ar1DSg1NoDbQRISbK7ABaZ1QS1XtU5YH8OvUvw0JAs=",
	  "cred-writer": "3pP5wMN5HHGkBAjkZdsZ4hQ6GaPm4yiXXuNXdw1PGt4= 2ar1DSg1NoDbQRISbK7ABaZ1QS1XtU5YH8OvUvw0JAs=",
	  "cred-reader": "3pP5wMN5HHGkBAjkZdsZ4hQ6GaPm4yiXXuNXdw1PGt4= 2ar1DSg1NoDbQRISbK7ABaZ1QS1XtU5YH8OvUvw0JAs="
    },
    "realm": "Solr",
    "forwardCredentials": false
  },
  "authorization": {
    "class": "solr.RuleBasedAuthorizationPlugin",
    "user-role": {
      "cred-superadmin": ["admin"],
      "cred-writer": ["indexer"],
      "cred-reader": ["readonly"]
    },
    "permissions": [
      { "name": "security-edit", "role": "admin" },
      { "name": "security-read", "role": "admin" },
      { "name": "collection-admin-edit", "role": "admin" },
      { "name": "collection-admin-read", "role": ["admin", "indexer", "readonly"] },
      { "name": "core-admin-edit", "role": "admin" },
      { "name": "core-admin-read", "role": ["admin", "indexer", "readonly"] },
      { "name": "schema-edit", "role": "admin" },
      { "name": "schema-read", "role": ["admin", "indexer", "readonly"] },
      { "name": "config-edit", "role": "admin" },
      { "name": "config-read", "role": ["admin", "indexer", "readonly"] },
      { "name": "update", "role": ["admin", "indexer"] },
      { "name": "read", "role": ["admin", "indexer", "readonly"] },
      { "name": "metrics-read", "role": ["admin", "indexer", "readonly"] },
      { "name": "health", "role": "*" },
      { "name": "zk-read", "role": "admin" }
    ]
  }
}
You will also need to enter the Solr Username and Solr Password in the System/Server Settings under the Search Preferences.